Layering Propagation:
Layering propagation is a horticultural technique used to propagate new plants from existing ones. It involves encouraging a stem or branch of a parent plant to take root while still attached to the parent plant, ultimately creating a genetically identical new plant.
This method is commonly used in gardening and plant propagation because it allows for the preservation of desirable traits from the parent plant.
What is layering in plants?
Layering is a technique of plant propagation where the new plant remains at least partially attached to the mother plant while forming new roots and can occur naturally through modified stem structures is known as layering in plants.
Layering propagation is the process whereby the branch of a tree, or other plant, produces roots and is separated from the original plant, becoming a new, separate plant.
Layering is a form of rooted cutting in which adventitious roots are produced on a stem while it is still attached to the plant That is also known as Layering Propagation.
Types of Layering :
There are several types of layering in plant propagation, each with its unique method and purpose. Layering propagation can be done by various methods. Some common methods of layering are as given below:
- Simple layering
- Compound (Serpentine) Layering
- Mound (Stool) Layering
- Tip Layering
- Air Layering
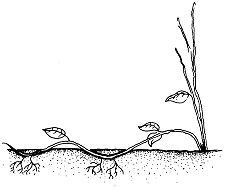
#1. Simple layering:

Credit by: https://content.ces.ncsu.edu/
Simple layering is a horticultural propagation technique used to create new plants from an existing parent plant. This method is particularly suitable for plants with flexible branches or stems, such as certain shrubs, roses, and berries. The process involves bending a portion of a healthy branch or stem down to the ground, encouraging it to develop roots while still attached to the parent plant. Once roots have formed, the new plant can be separated and transplanted to a new location.
Here is a step-by-step description of simple layering:
1. Select a Suitable Branch:
Choose a healthy and flexible branch on the parent plant that is ideally free from disease or damage. The branch should be long enough to bend down to the ground.
2. Bend the Branch:
Gently bend the selected branch down towards the ground without breaking it. The portion of the stem to be buried should touch the soil.
3. Prepare the Soil:
Clear the area where the stem will make contact with the soil. Loosen the soil and add a layer of compost or well-rotted organic matter to improve soil fertility and drainage.
4. Bury the Stem:
Bury the section of the stem that is in contact with the soil, making sure it’s covered with the prepared soil. You can use small stones or landscape pins to hold the stem in place if needed.
5. Secure the Stem:
To keep the bent stem in place and ensure it remains in contact with the soil, you can place a small rock or weight over the buried portion. This helps promote root formation.
6. Water and Maintain:
Keep the soil consistently moist, as adequate moisture is essential for root development. Regularly check the soil moisture level and water when necessary.
7. Monitor Growth:
Over several weeks to months, roots will begin to develop from the buried portion of the stem. You can gently dig around the buried section to check for root formation without disturbing the plant.
8. Separate and Transplant:
Once the new plant has developed a sufficient root system, it can be carefully separated from the parent plant by cutting the stem just below the rooted section. Transplant the new plant to its desired location in the garden or in a pot.
Simple layering is an effective and accessible method for propagating many types of plants. It allows gardeners to create new plants with genetic traits identical to the parent plant, making it a popular choice for expanding gardens or sharing plants with others.
#2. Compound (Serpentine) Layering:
Credit by: https://content.ces.ncsu.edu/
Compound layering, also known as serpentine layering, is a specialized horticultural propagation technique used to create multiple new plants from a single parent plant simultaneously. This method is particularly useful when you want to propagate several stems from the parent plant to expand your garden or share plants with others. Compound layering gets its name from the way stems are layered in a serpentine or S-shaped pattern in the soil, encouraging root formation along multiple points of the stem.
Here’s a step-by-step description of compound layering:
1. Select Healthy Branches:
Choose several healthy branches on the parent plant that are suitable for layering. These branches should be flexible and free from damage or disease.
2. Prepare the Soil:
Clear the area where the stems will make contact with the soil. Loosen the soil and improve its fertility by adding compost or well-rotted organic matter.
3. Bend and Layer the Stems:
For each selected branch, gently bend it to the ground in a serpentine or S-shaped pattern. Make sure each bend is in contact with the soil. You can use small stones or landscape pins to hold the stems in place if necessary.
4. Bury and Secure:
Bury each bend of the stem under the soil, ensuring that it is well-covered. You may use weights or rocks to secure the bends in place to prevent them from popping up.
5. Maintain Adequate Moisture:
Keep the soil consistently moist around the buried sections of the stems. Adequate moisture is crucial for root development.
6. Monitor Growth:
Over time, roots will begin to form along the buried portions of each stem. You can check for root development by gently digging around the bends without disturbing the plant.
7. Separate or Leave Connected:
Once the new plants have developed a sufficient root system, you can choose to separate them individually or leave them connected to the parent plant. Separating them allows you to transplant the new plants to different locations, while leaving them connected can create a denser, multi-stemmed plant.
Compound layering is an efficient method for multiplying plants, especially when you want to create several new plants from one parent plant simultaneously. It’s an excellent choice for gardeners who want to expand their gardens quickly or propagate multiple specimens of a desirable plant.
#3. Mound (Stool) Layering:
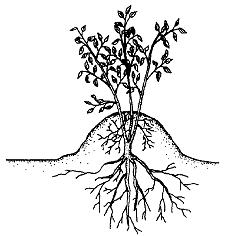
Credit by: https://content.ces.ncsu.edu/
Mound layering, also known as stool layering, is a horticultural propagation technique used primarily for woody shrubs and some types of trees. It involves creating a mound or stool by cutting back a mature plant to ground level and then encouraging new shoots to grow from the base of the stool. This method is particularly useful for rejuvenating old or overgrown shrubs and for propagating certain varieties.
Here’s a step-by-step description of mound layering:
1. Select the Parent Plant:
Choose a mature woody shrub or tree that you want to propagate or rejuvenate. Make sure the plant is healthy and disease-free.
2. Timing:
Perform mound layering during the plant’s dormant season, typically in late winter or early spring before new growth begins.
3. Prune the Plant:
Use pruning shears or a saw to cut back the entire plant to near ground level, leaving only a short stump, or “stool,” with a few inches of the main stem or trunk above the ground.
4. Create a Mound:
Build a mound of well-draining soil, compost, and organic matter around the base of the stool. The mound should be several inches high and wide, covering the stool entirely.
5. Encourage New Growth:
As the weather warms and the growing season begins, new shoots will emerge from the stool’s base, just above the soil line. These shoots are known as “suckers.”
6. Select Healthy Suckers:
Choose the healthiest and most vigorous suckers to become your new plants. Typically, you’ll want to select three to five strong suckers for propagation.
7. Prepare Suckers:
Trim the selected suckers to a manageable length, usually 4 to 6 inches, by cutting just below a node (a small bump on the stem from which leaves and branches grow). Remove any leaves or buds from the lower part of the stem.
8. Plant the Suckers:
Plant the prepared suckers in individual pots filled with well-draining potting mix. Make a hole in the soil, insert the sucker, and gently firm the soil around it.
9. Water and Maintain:
Keep the newly potted suckers consistently moist but not waterlogged. Place them in a location with indirect sunlight or partial shade to prevent excessive stress.
10. Transplant or Grow in Pots:
Once the new plants have established roots and are showing healthy growth, you can transplant them to their permanent locations in the garden or grow them in larger pots.
Mound layering is an effective way to propagate woody plants and rejuvenate older specimens. It allows gardeners to create multiple new plants from a single parent plant and is particularly valuable for preserving the characteristics of desirable plant varieties.
#4. Tip Layering:
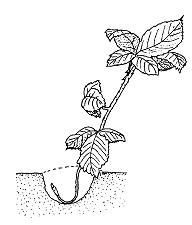
Credit by: https://content.ces.ncsu.edu/
Tip layering is a propagation technique commonly used for certain types of plants, especially those with long, flexible stems. This method involves burying the tips of branches or stems into the soil to encourage them to produce roots and form new plants. Tip layering is a straightforward method that allows gardeners to create new plants while the parent plant continues to grow.
Here’s a step-by-step description of tip layering:
1. Select a Healthy Branch or Stem:
Choose a healthy and flexible branch or stem on the parent plant. This branch should have enough length to be buried into the soil. It’s best to perform tip layering during the active growing season when the plant is producing new growth.
2. Prepare the Soil:
Clear the area around the selected branch where you plan to bury the tip. Loosen the soil and mix in some compost or well-rotted organic matter to improve its fertility and drainage.
3. Bend the Tip:
Gently bend the tip of the selected branch down to the ground, keeping it in contact with the soil. You may need to create a small trench in the soil to accommodate the bent tip.
4. Make a Slanted Cut:
Make a slanted cut on the underside of the tip, just below a node. A node is a small bump on the stem from which leaves and branches grow. The slanted cut exposes more of the inner tissue, promoting root development.
5. Bury the Tip:
Bury the cut tip in the prepared soil, leaving a small portion of the tip exposed above the soil surface. Ensure that the soil is firmly in contact with the buried section.
6. Secure the Tip:
To keep the tip in place and prevent it from popping up, you can use a landscape pin or a small stone to anchor it to the ground.
7. Water and Maintain:
Keep the soil around the buried tip consistently moist to promote root development. Regularly check the moisture level and water as needed.
8. Monitor Growth:
Over several weeks to months, roots will begin to form from the buried tip. You can gently check for root development by carefully digging around the tip without disturbing the plant.
9. Separate the New Plant:
Once the new plant has developed a sufficient root system, carefully cut it from the parent plant just below the rooted section. Transplant the new plant to its desired location in the garden or in a pot.
Tip layering is a simple and effective method for propagating certain plants and creating new specimens. It allows gardeners to multiply their plants without relying on seeds or more complex propagation techniques, making it a popular choice for many garden enthusiasts.
#5. Air Layering:
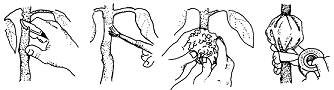
Credit by: https://content.ces.ncsu.edu/
Air layering is a specialized horticultural propagation technique used to create new plants from existing ones, particularly woody plants and trees. This method is highly effective and often chosen when other propagation methods, like cuttings, may not yield successful results. Air layering involves encouraging a portion of a branch to produce roots while still attached to the parent plant. Once roots have developed, the newly rooted section can be separated and planted as a new individual plant.
Here’s a step-by-step description of air layering:
1. Select a suitable plants:
Choose a healthy branch on the parent plant that is approximately the thickness of a pencil. The selected branch should have vigorous growth and be free from disease or damage.
2. Timing:
Air layering is typically performed during the active growing season, which is often in the spring or early summer when the plant is producing new growth.
3. Identify the Location:
Identify a spot on the branch where you want to create the air layer. This spot should be free from branches, leaves, and buds.
4. Make a Horizontal Cut:
Using sharp pruning shears or a knife, make a horizontal cut around the branch, removing a small ring of bark and cambium layer. This cut is known as “girdling” and should be about 1 inch long.
5. Apply Rooting Hormone:
To encourage root formation, apply a rooting hormone to the exposed cambium layer. Rooting hormone can be found at garden supply stores and helps stimulate root growth.
6. Wrap with Moist Material:
Surround the girdled area with moist sphagnum moss or peat moss. The moss should be evenly packed and secured in place with plastic wrap. This creates a humid environment, which is essential for root development.
7. Seal with Plastic Wrap:
Cover the moss and the girdled area with a sheet of plastic wrap, ensuring it is tightly sealed around the branch. This helps maintain the humidity and prevents moisture loss.
8. Monitor and Water:
Check the air layer periodically to ensure that the moss remains moist. If it dries out, add more water. Keep the surrounding environment consistently humid.
9. Root Development:
Over a period of several weeks to a few months, roots will begin to develop within the moss and around the girdled area.
10. Separate the New Plant:
Once you see that the roots are well-developed and have a sufficient mass, carefully cut the branch just below the air layer, separating the newly rooted plant from the parent plant.
11. Transplant the New Plant:
Transplant the new plant into a suitable pot or directly into the garden, ensuring it receives proper care and attention as it establishes itself in its new location.
Air layering is a highly reliable method for propagating woody plants and trees, particularly those that may be challenging to propagate by other means. It allows gardeners to create new plants with the same desirable traits as the parent plant, making it a valuable technique in horticulture.
Advantages of layering in plants:
Some advantages of Layering propagation in plants are as given below:
1. Preservation of Genetic Traits:
Layering allows for the creation of new plants that are genetically identical to the parent plant, preserving desirable characteristics such as flower color, fruit quality, or disease resistance.
2. Reliable Method:
Layering is a highly reliable propagation method, often producing higher success rates compared to some other techniques like cuttings.
3. Faster Growth:
Layered plants often establish themselves more quickly than those grown from seeds because they already have a developed root system.
4. Multiple Offspring:
Layering can result in multiple new plants from a single parent, making it a cost-effective way to increase plant numbers.
5. No Specialized Equipment:
Layering requires minimal equipment and is accessible to gardeners of all skill levels. It doesn’t necessitate a greenhouse or complex setups.
6. No Seed Production:
Some plants don’t produce seeds or produce seeds that don’t reliably reproduce the desired traits, making layering the preferred propagation method.
7. Year-Round Propagation:
Depending on the method and plant type, layering can be performed throughout the year, allowing for continuous propagation.
8. Established Root System:
Layered plants start with a well-developed root system, which increases their chances of survival when transplanted.
9. Stronger Plants:
Layered plants often have thicker stems and are generally more robust than those grown from seeds, as they inherit some of the parent plant’s maturity.
10. Suitable for a Variety of Plants:
Layering is adaptable and can be used for a wide range of plants, including trees, shrubs, vines, and some herbaceous perennials.
Disadvantages of layering in plants:
There are also some Disadvantages of layering propagation in plants which are described as given below:
1. Limited to Certain Plant Types:
Layering may not be suitable for all plant species, particularly those with rigid, non-flexible stems.
2. Time-Consuming:
Layering propagation can take longer to produce new plants compared to some other methods like seed propagation.
3. Risk of Failure:
There is a risk that the layered branch or stem may not develop roots successfully, leading to propagation failure.
4. Space Requirement:
Layering often requires space for the parent plant and the newly layered branches or stems, which may not be practical in small gardens or indoor settings.
5. Skill and Knowledge Required:
While layering is relatively straightforward, it still requires some horticultural knowledge and skills to execute correctly.
6. May Not Preserve All Traits:
While layering preserves many genetic traits of the parent plant, it may not be as precise as techniques like tissue culture, which can clone plants with absolute fidelity.
7. May Not Produce True-to-Type Offspring:
In some cases, especially with plants that are prone to mutation, the layered offspring may exhibit slight variations from the parent plant.
8. Dependency on Parent Plant:
Layered plants remain dependent on the parent plant until they are separated, which can limit their potential for growth or development.
9. Susceptibility to Disease:
If the parent plant is diseased, there’s a risk of transmitting the disease to the layered offspring.
10. Propagation Seasonality:
Some layering methods are best performed during specific seasons, which can limit the flexibility of when you can propagate plants using this technique.
FAQ:
Can I use layering propagation on any plant?
Layering propagation is most successful on plants with flexible branches and the ability to form roots along stems. Not all plants are suitable for this method.
How long does it take for layered plants to establish themselves?
The time required for establishment varies depending on the plant species and environmental conditions. It can take several weeks to several months.
Is layering propagation suitable for fruit trees?
Yes, layering propagation, especially air layering, is commonly used for fruit trees like citrus and figs.
What is the best season for layering propagation?
The ideal time for layering is during the plant’s active growing season, typically in the spring or early summer.
Can I propagate multiple plants from one parent plant using layering?
Yes, compound layering allows you to propagate multiple stems from a single parent plant, creating several new plants at once.
layering in plants examples
Here are some examples of plants commonly propagated through layering: Blueberries, Wisteria, Figs, Roses, Honeysuckle, Forsythia, and Camellias, etc.
Conclusion:
Layering propagation, a technique widely used in plants, empowers gardeners to multiply their favorite species while preserving their unique characteristics. Whether you opt for air layering, simple layering, compound layering, or serpentine layering in plants, this method guarantees the creation of genetically identical new plants.
With practice and care, mastering layering propagation in plants becomes an enjoyable and rewarding journey. Expand your garden, rejuvenate aging specimens, and share your passion with fellow enthusiasts through the art of layering propagation in plants. It’s a sustainable way to ensure that the legacy of your cherished plants endures for generations.
Read More:
Green House Technology-Meaning, Types Advantages, Disadvantages, and Components
Thanks much for this information. It is a big help to me aside from additional knowledge that i can share to other people. More power and God bless!!!.